How Do I Install My Electric Fence?
Grounding
Grounding your electric horse fence system is a very important step you cannot overlook when installing your fence. The grounding system works as an alternative route for electrical current to follow back to the ground, in case something should go wrong with the wiring. Never run an electric fence parallel to telephone wires.
If you have Shockline or a Pro-Tek electric fence series, we have a ground rod kit that includes everything you need to ground your electric fencing. Should you have a copper-based fence system (like ElectroBraid™), you will need copper fencing supplies, not stainless steel. When installing a stainless steel electric fence system, the 5' ground rods should be spaced 10' apart and at least 50' away from any water source.
Electric Connections
Electricity travels around the outside of a wire, as opposed to through the wire, so to determine what connectors you will need is based on the metal used to conduct the electricity (stainless steel or copper). Understanding the difference is important before installing your fence system. You can read more about the difference between fence conductors here.
For both stainless steel and copper fence systems, it's important you run your burial wire from the top rail on-down. The reasoning behind this is because if a bottom rail is shorting out (touching high grass/weeds, snow, etc.) it will cut the electric current out for the whole fence system. You're going to need to run the burial wire from the ground all the way up to the top rail, then downwards.
Troubleshooting Techniques:
- Check your grounding.
- Disconnect electric fence charger and test its charge.
- Disconnect your fence line & test the fence rail/burial cable with a fence tester. Start your testing from the top rail, downwards. *A test compass will tell you exactly where it's at.
- If you hear any popping noises, it means your electric connection is shorting out – make sure your connection points are tight.
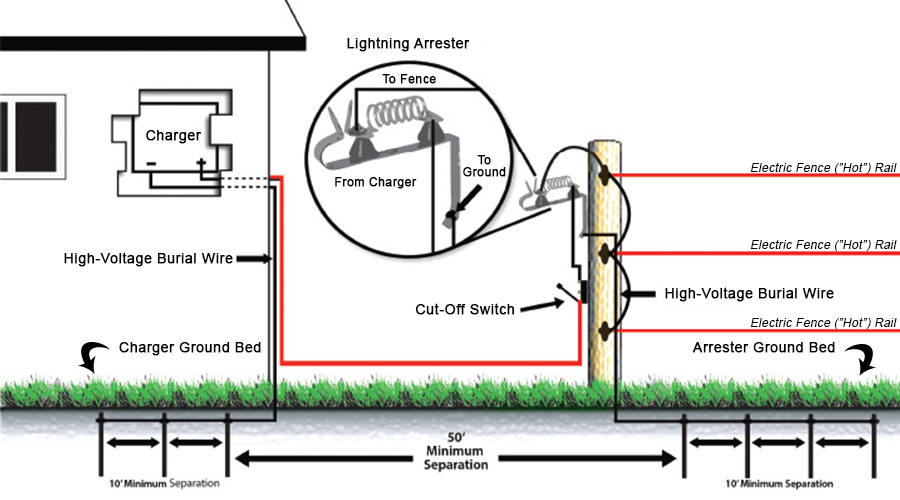
A really underrated electric fence product is the cut-off switch. It's used to either open or cut-off the electrical current to your fence rail. If a rail is being shorted by touching tall grass, snow build-up, or anything else it will disrupt your electric current; consider installing a cut-off switch to prevent an outage. You can either install one at the top rail to cut the electric current to the whole fence system or you can install multiple switches on specific rails. Many customers whose property accumulates heavy snowfall in the winter or has tall grass and weeds put them on a couple of the bottom rails so they can cut the electric if there's a disruption.
Electric Fence Chargers
To determine what electric fence charger to use for your electric fence system you will need to figure: length x width = square footage. The square footage divided by 43,560 = the number of acres covered. Acre listings are given for each electric fence charger. When installing your electric fence charger, it's important you keep it covered; we recommend installing plug-in chargers within 50' of your fence system.
Additionally, if you're installing an electric fence system, we always recommend you protect your investment from lightning. If you have a lot of lightning in your area, you can add a lightning arrester to protect your electric fence system should a lightning bolt strike.
Electric Fence Insulators
Insulators are used to keep the electric current running down the fence rail. RAMM insulators feature simplified installation methods and have been field-tested. If you have horses that are coming in contact with your fence or like the other side (where the grass is always greener), extended insulators may be best. If you're unsure what insulators are compatible with your fence and/or posts be sure to check this electric fence insulators guide or we have friendly account managers who can walk you through everything – call 800-434-8456 to get started today!